1. Download Vine Server from their Source Forge page on the computer you want to connect to (not the computer that you will be connecting from)
2. Once you've done that, copy Vine Server to your Applications folder, and open it. It will prompt you to either enter a password, or require no authentication. I would highly recommend entering a password (you don't want just anyone to connect to your computer)
3. Once you've entered a password (or not), you'll see the Vine Server interface. As you can see, it's a very simple interface, but beneath that simple interface is a powerful VNC server.
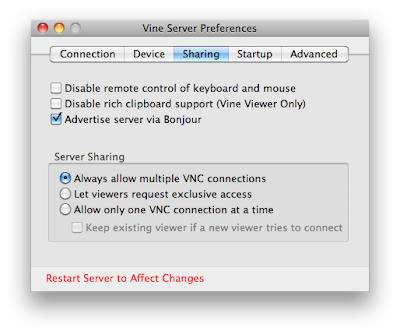
4. Towards the bottom of the screen, you'll see "Port: [port number]." The default number is 5900. Make sure you know the port number. If you are planning on connecting to multiple desktops, you'll probably want to change that number. I would recommend at least setting the preferences to have a static port number (a port that doesn't change; the default port is automatic). Open the Vine Server preferences.
5. If you are planning on connecting to multiple desktops, set the "Display Number: " menu to "1." Notice that the port number is now "5901" instead of "5900." If you aren't planning on connecting to multiple desktops, set the display number to "0." Note that the port number won't change, but it will give the server a static port number.
6. Don't close up the preferences yet. Go to the "Sharing" tab, and under "Server Sharing," select "Always allow multiple VNC connections." This will allow you to connect to a different desktop. You can close the preferences window once you've done this.
7. Before you can connect, you will need the IP address of the server. It should be in green letters and should look something like 192.168.2.3. Make sure you know that address. You may have noticed the "Restart Server to Affect Changes" (it actually should be "Effect" instead of "Affect") in the preferences window. Go ahead and click the "Restart Server" button in the bottom right-hand corner to apply the changes you made in the preferences.
8. Fast User Switching must be on to be able so that you can connect to the Mac. If you already have Fast User Switching on, you can skip this step. To enable Fast User Switching, go to System Preferences>Accounts and click on "Login Options" at the bottom of the users panel. Then, enable "Show fast user switching as: " by clicking the checkbox. The drop-down menu gives you options for how you want to display the menulet.
9. Now, head over to the client (the Mac that you will be connecting from) and in the Finder, press Command-K (or you can just go to the Go menu>Connect to Server). When the window appears, type the server's IP address followed by ":" and the port number. It should look like this, where "192.168.2.3" is the IP address and the ":5901" is the port number:
10. Hit "Enter." The Screen Sharing application should open up and connect to the server. If you set a password, it will ask you for the password. That's all! It should work. If you run into problems, feel free to leave a comment.
This should theoretically work with a PC as a server, but since Vine Server doesn't have a PC version and I don't have two PCs, I can't test it. Please let me know if you are able to do this with a PC.
Thanks for following this tutorial! If you want to find more tutorials like this, check out my tutorials page.
~Matthew


No comments:
Post a Comment