Thursday, August 11, 2011

How To Make Grooveshark A Stand-Alone Application with Hot Keys, Part 2 of 2 for Windows Users

Click here for the first part of this tutorial.

Grooveshark logo


1. Download Wget for PC here and grab a copy of AutoHotKey here. Install both.

AutoHotkey logo


2. Open AutoHotkey, (it's located wherever you downloaded it). When it asks you if you want to generate a example script, click "Yes".


Create sample script in Auto Hot Key

3. Create a new hot key for Grooveshark by adding this line:
    HOTKEYS::Run, WGET_EXE --spider --no-cache KEYSHARKY_API, , Hide

4.  The "HOTKEYS" is where you define the keyboard shortcut. For example, you could put #G (Windows key and "G" key) See the AutoHotkey documentation for more info.

5. Replace the WGET_EXE with the path to the location of the wget executable. Normally it is installed in C:\Program Files (x86)\GnuWin32\bin\wget.exe If you are not sure where it was installed, go to the Start Menu>Run>cmd. Once you are in the command line, run this command:
     dir c:\ /s /b | find "wget.exe"
When it returns the path, copy and paste the path and replace the WGET_EXE section.

WGET command prompt


When you are all finished, the code will look similar to this, except the keyboard shortcut will be your own:
    !+z::Run, "C:\Program Files (x86)\GnuWin32\bin\wget.exe" --spider --no-cache "http://localhost:8800/play", , Hide
The above code will play/pause Grooveshark when ALT + SHIFT + Z is pressed.


6. Repeat steps 3-5 to add another hot key. See the below commands to change the hot key command.
Adding hot keys to Auto Hot Key

This is a list of all the keySharky commands. To change the hot key command, change the URL (http://localhost:8800/play)

Play/Pause current song:
http://localhost:PORT/play

Stop playing current song:
http://localhost:PORT/stop

Select previous song in playlist:
http://localhost:PORT/previous

Select next song in playlist:
http://localhost:PORT/next

Favorite current song:
http://localhost:PORT/favorite

Vote up current song:
http://localhost:PORT/voteup

Vote down current song:
http://localhost:PORT/votedown

Clear vote of current song:
http://localhost:PORT/voteclear

Toggle mute (>= version 1.5.2):
http://localhost:PORT/mute

Decrease volume (>= version 1.5.2):
http://localhost:PORT/voldown

Increase volume (>= version 1.5.2):
http://localhost:PORT/volup

Replace "PORT" with whatever port number you chose in the keySharky preferences.

The API server has access to every keyboard shortcut toggle in keySharky, so you can play, stop, select next song etc. easily with one of the above methods.

You are done!! Have fun using your Grooveshark player and thanks for following this tutorial. Please follow my blog if you liked this tutorial.

-- Matthew

How To Make Grooveshark A Stand-Alone Application with Hot Keys, Part 2 of 2 for Mac Users

Click here for the first part of this tutorial.


Grooveshark logo


1. Download Spark, a free global hot key application for OS X. You pick up a copy here.


Spark logo


2. Once you have installed Spark, launch it. When the Spark window starts up, create a new Applescript hot key by either going to the gear menu in the top left-hand corner and selecting Applescript or by going to File>New HotKey>Applescript


Spark: Gear Menu>New Hotkey>Applescript


Spark: File>New Hotkey>Applescript /></span></a></div>
<span class=


3. Enter this information in the setup window that slides down:
1. Shortcut: ⌃⌘⌥ F8 (you can change this to anything)
2. Name: Play/Pause Grooveshark (again, you can change this name to anything)
3. Down in the text area, enter this:
     do shell script "curl http://localhost:8800/play"
(Note: If you changed the default port number in keySharky, the port number in the hot key preferences needs to be changed too.)


4. Repeat for all other hot key commands that you want. See below for all the keySharky commands.


5. Also, make sure that the Spark daemon has been started, otherwise your hot keys will not work. The "Start Spark Daemon" button is at the very bottom in the center of the Spark window.


Start Spark daemon


This is a list of all the keySharky commands. To change the hot key command, change the URL in the hot key preferences.


Play/Pause current song:
http://localhost:PORT/play


Stop playing current song:
http://localhost:PORT/stop


Select previous song in playlist:
http://localhost:PORT/previous


Select next song in playlist:
http://localhost:PORT/next


Favorite current song:
http://localhost:PORT/favorite


Vote up current song:
http://localhost:PORT/voteup


Vote down current song:
http://localhost:PORT/votedown


Clear vote of current song:
http://localhost:PORT/voteclear


Toggle mute (>= version 1.5.2):
http://localhost:PORT/mute


Decrease volume (>= version 1.5.2):
http://localhost:PORT/voldown


Increase volume (>= version 1.5.2):
http://localhost:PORT/volup


Replace "PORT" with whatever port number you chose in the keySharky preferences.


The API server has access to every keyboard shortcut toggle in keySharky, so you can play, stop, select next song etc. easily with one of the above methods.


You are done setting up your Grooveshark application!! Thank you for using this tutorial and please follow my blog if you liked it.


-- Matthew

How To Make Grooveshark A Stand-Alone Application with Hot Keys, Part 1 of 2


Grooveshark logo


This tutorial will show you how to make Grooveshark a stand-alone application with hot keys, for free! First, you'll need to download these files.
Mozilla Prism logo


1. Download Prism here. Prism is an application developed by Mozilla, and turns web URLs into standalone applications. More information about Prism can be found at the Prism wiki.


Download Mozilla Prism


2. Open Prism and fill in the information as follows:
1. URL: http://www.grooveshark.com
2. Name: Grooveshark
3. Select the checkboxes "Show status messages and progress", "Desktop" (Under "Create Shortcuts")
4. Under the "Settings" drop-down menu (at the bottom), navigate to the folder that you downloaded earlier and select "grooveshark_icon.png"
5. Click "OK"


Main Mozilla Prism window


Your new Grooveshark application will show up on your desktop and the application will launch itself.


Notice that the advertisement sidebar is showing on the left side of the application. We will fix that later.


New Grooveshark Prism application


3. Install Greasemonkey and keySharky. They are both included in the folder that you downloaded earlier in this tutorial. The two files that you want are called "greasemonkey-for-prism-0.8.20100413.0.xpi" and "keySharky-prism-latest.xpi". If you want to, you can download them (for newer versions with possible updates). Greasemonkey for Prism can be downloaded here and keySharky for Prism can be downloaded here. Note that if you are going to download these add-ons, you cannot use Firefox to download them. Firefox will see these files as add-ons and try to install them in Firefox.


Grooveshark ad sidebar


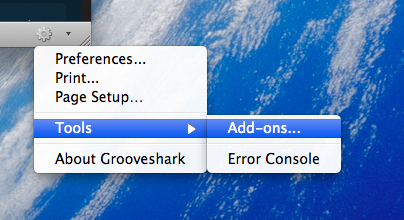
4. Go back to your Grooveshark application that you created with Prism, and click the gear icon at the bottom right-hand corner of the Grooveshark application. Go to Tools>Add-Ons…


Greasemonkey logo


5. In the Add-Ons window, click the "Install" button down on the bottom of the window. Navigate to the Greasemonkey add-ons (either in the folder that you downloaded at the very beginning or if you downloaded it, in your downloads folder). A window will ask if if you are sure you want to install the add-on:


Tools>Add-ons in Prism application


Mozilla Prism application: Add-ons window


Mozilla Prism application: Installing add-ons


You will also have to wait for five seconds before you can install it (until the "Install Now" button appears).


6. The add-ons window will now ask you to restart the Grooveshark application. Restart Grooveshark and repeat the last two steps to install the keySharky add-on.


7. Open up the Add-Ons window again (Gear menu>Tools>Add-Ons…) and make sure that both Greasemonkey and keySharky are installed.


8. Before you close up the add-ons window, click the "Preferences" button for keySharky and make sure that the "Start with Prism" checkbox is selected and click the "Start" button to start the API server for keySharky. Also, note the port number. By default, it is 8800, but you can change it to whatever port you want.


You are now done setting up the Grooveshark application. Click here to go to part 2 for Mac users. Click here to go to part 2 for Windows users.


-- Matthew

Monday, August 8, 2011

How to download videos from YouTube


YouTube is great for watching videos online, but sometimes videos go away. So, in this tutorial, I'll teach you how to download videos from YouTube. Though I'm on a Mac, this tutorial should apply to PC users as well.
1. Grab the URL of the YouTube video that you want to download. It should look something like this:


2. Then, go to KeepVid.com and enter the URL in the download bar


3. ...And click Download. The page should say "Loading Java applet". Depending on your browser, you may have to grant the applet permission to run.


4. Once the page has finished processing the URL, it should give several options for downloading the video:


5.  For this example, I am going to choose the MP4 version of the movie. The higher the number to the left of the download options, the better the quality. Also, as you can see, there is an option just to download the sound from the movie. So, I downloaded the MP4 version:


I'm on Firefox, so the download window looks like the above. If you're on Safari, it'll look like this:

6. Technically, you are done downloading the video and you can skip these next steps, but if you want a more friendly version of the Youtube video (MP4s are not the best), follow these next steps. So, right-click (control-click) on the file that you downloaded, and open with Quicktime Player. If you are on a PC, this will be a little different, as you may have to download Quicktime Player. You can do that here.


7. Go to File>Save As...


And save as a movie.


The above screenshot is one of Quicktime Player X. If you are using Quicktime Player 7, the Save As... dialog will look a little bit different. One thing to note here is the "Save as a self-contained movie" radio button option. You want to make sure that this radio button is selected because the other option, "Save as a reference movie" requires that you have the original file.

Click Save, and...
8. And you are done! Have fun watching your Youtube video.

-- Matthew

Rumors of an iPad 3


There has been much speculation over whether there will be an iPad 3 released this fall. For one, Apple is going to have competition when new Android 3.0 tablets flood the market this fall. It would also make since for Apple to release a new version before Christmas to gain sales.


There are many rumors and not many facts. For example, the folks at iPad 3 News Blog, have written many articles about what exactly will be released. According to these articles, Apple may be releasing an updated version of the iPad 2 called the iPad 2 Plus before an iPad 3 comes out. Yet another article here talks about Apple releasing the iPad 3 with a screen resolution that will be 5-6 times higher than the iPad and iPad 2. We may be seeing an updated iPad 2 when iOS 5 launches this fall, and in early 2012 see an iPad 3. It's definitely interesting to keep updated on what may (or may not be) released by Apple in the near future.
-- Matthew

Internet TV


Internet TV is changing the way we watch TV. With services such as Netflix, Hulu, and Boxee, you can watch TV wherever you go, on your phone, tablet computer, or laptop.


The Roku 2


Two interesting set-top boxes, or internet streaming boxes are Roku and Apple TV. The base Roku player is only $60, compared to the Apple TV, which is $100. The top model Roku player costs $100 and includes most of the features of Apple TV. In this post, I will contrast the Roku player to Apple TV. Note that the Roku player that I am referencing is the top model Roku player.


Apple TV 2
The Roku has some nice streaming features that Apple TV doesn't offer. For example, the Roku can stream from Pandora, TuneIn, and Last.fm. Unfortunately, Apple TV doesn't offer these streaming services, but Apple TV does offer Airplay, which allows you to wirelessly stream content from your iPad, iPhone, or iPod touch.
Here's a list of the features that the Roku and Apple TV offer:


FeatureRokuApple TV
Netflix✓✓
Hulu Plus✓✗
Movie Rentals✓✓
Movie Purchases✓✓
Sports Packages✓✓
Streaming iTunes content wirelessly✓✓
Free Internet radio (like Pandora, Last.fm)✓✗
Photo and video content (like Flickr and Youtube✓✓
Major news programs✓✓
720p HD streaming✓✓
1080p HD streaming✓✗
Connects to standard/traditional TVs✓✗
Connects to HDTVS✓✓
Wi-Fi✓✓
Wireless N✓✓
Ethernet✓✓
USB Port✓✗
iPad, iPhone, and iPod Touch control✗✓
Streaming iPad, iPhone, and iPod touch content✗✓
Remote control✓✓
Games✓✗
Here's a great article covering several other Internet TV services in detail. -- Matthew

Monday, August 1, 2011

Self-Parking Cars


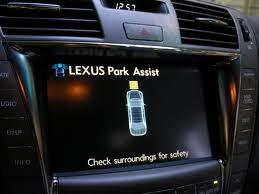
I was reading here about self-parking cars. Very cool technology! Though the car is not completely autonomous (it requires the driver to release the brake pedal while the computer controls the steering wheel), it makes the job of parallel parking easier. Six manufacturers, Ford,  Lexus, Toyota,  Mercury, Lincoln, and BMW offer self-parking cars.
To park the car, the computer uses sensors on the bumpers to detect open parking spaces. Then, the car tells the driver what to do via a computer screen with instructions on when to brake, etc. The car can't yet completely park itself but...it's a start. The Lexus LS also includes a backup camera to see where the car is going. All very interesting and upcoming technology!! It's going to be interesting to see what happens in the next ten years. Really interesting!


Matthew