Showing posts with label Tutorial. Show all posts

Wednesday, April 11, 2012

How to uninstall the Flashback Trojan


 The Flashback trojan is a Mac virus that now has control of over 600,000 Macs. It poses as the Adobe Flash Player Updater and exploits a security hole in Java. It then steals all your user names and passwords for popular websites. Apple released a Java update that fixes the problem. Download Java for Mac OS X 10.6 Update 7 (Snow Leopard users) or Java for OS X Lion 2012-002 (Lion users). Both these links are to Apple KB articles that describe the update and allow you to download the installer package.

Recently there was a question posted on Ask Different asking Is my Mac infected with the Flashback trojan? I posted an answer to the question, which was voted up quite a bit and was accepted by the asker. Here are instructions from F-Secure on how to check for the Flashback trojan, and remove it:
  1. Run the following command in Terminal (Applications> Utilities >Terminal

    defaults read /Applications/Safari.app/Contents/Info LSEnvironment
  2. Take note of the value DYLD_INSERT_LIBRARIES
  3. Proceed to step 8 if you got the following error message:

    The domain/default pair of (/Applications/Safari.app/Contents/Info, LSEnvironment) does not exist
  4. Otherwise, run the following command in Terminal:

    grep -a -o '__ldpath__[ -~]*' %path_obtained_in_step2%

  5. Take note of the value after "__ldpath__"
  6. Run the following commands in Terminal (first make sure there is only one entry from step 2):

    sudo defaults delete /Applications/Safari.app/Contents/Info LSEnvironment

    sudo chmod 644 /Applications/Safari.app/Contents/Info.plist

  7. Delete the files obtained in steps 2 and 5.
  8. Run the following command in Terminal:

    defaults read ~/.MacOSX/environment DYLD_INSERT_LIBRARIES
  9. Take note of the result. Your system is already clean of this variant if you got an error message similar to the following:

    "The domain/default pair of (/Users/joe/.MacOSX/environment, DYLD_INSERT_LIBRARIES) does not exist"
  10. Otherwise, run the following command in Terminal:

    grep -a -o '__ldpath__[ -~]*' %path_obtained_in_step9%
  11. Take note of the value after "__ldpath__"
  12. Run the following commands in Terminal:

    defaults delete ~/.MacOSX/environment DYLD_INSERT_LIBRARIES

    launchctl unsetenv DYLD_INSERT_LIBRARIES
  13. Finally, delete the files obtained in steps 9 and 11.
An alternative to the Terminal method is Flashback Checker. It is a free little application that checks for the trojan and tell you whether you are infected or not.

Wednesday, September 7, 2011

Lion-like screen sharing without Lion

Mac OS X Lion screen sharing
This was so amazing I just had to share it. You probably have heard about Lion's new screen sharing. Well, did you know that you can get the same capabilities on a non-Lion Mac? Yes, you heard it right, Lion-like screen sharing on a non-Lion Mac. It's absolutely amazing! I can now have two users logged in to the same computer, one is a physical user actually sitting at the computer, the other is a networked user who can log into his/her desktop without disrupting the physical user. Let's get into how to do this.


1. Download Vine Server from their Source Forge page on the computer you want to connect to (not the computer that you will be connecting from)
2. Once you've done that, copy Vine Server to your Applications folder, and open it. It will prompt you to either enter a password, or require no authentication. I would highly recommend entering a password (you don't want just anyone to connect to your computer)


Vine Server enter password


3. Once you've entered a password (or not), you'll see the Vine Server interface. As you can see, it's a very simple interface, but beneath that simple interface is a powerful VNC server.


Vine Server startup window


4. Towards the bottom of the screen, you'll see "Port: [port number]." The default number is 5900. Make sure you know the port number. If you are planning on connecting to multiple desktops, you'll probably want to change that number. I would recommend at least setting the preferences to have a static port number (a port that doesn't change; the default port is automatic). Open the Vine Server preferences.


Vine Server preferences


5. If you are planning on connecting to multiple desktops, set the "Display Number: " menu to "1." Notice that the port number is now "5901" instead of "5900." If you aren't planning on connecting to multiple desktops, set the display number to "0." Note that the port number won't change, but it will give the server a static port number.


Vine Server display port number


6. Don't close up the preferences yet. Go to the "Sharing" tab, and under "Server Sharing," select "Always allow multiple VNC connections." This will allow you to connect to a different desktop. You can close the preferences window once you've done this.


Vine Server preferences


7. Before you can connect, you will need the IP address of the server. It should be in green letters and should look something like 192.168.2.3. Make sure you know that address. You may have noticed the "Restart Server to Affect Changes" (it actually should be "Effect" instead of "Affect") in the preferences window. Go ahead and click the "Restart Server" button in the bottom right-hand corner to apply the changes you made in the preferences.


Restart Vine Server

Restart Vine Server button


8. Fast User Switching must be on to be able so that you can connect to the Mac. If you already have Fast User Switching on, you can skip this step. To enable Fast User Switching, go to System Preferences>Accounts and click on "Login Options" at the bottom of the users panel. Then, enable "Show fast user switching as: " by clicking the checkbox. The drop-down menu gives you options for how you want to display the menulet.


System Preferences Mac OS X Account pane

System Preferences login options


System Preferences Mac OS X show fast user switching


9. Now, head over to the client (the Mac that you will be connecting from) and in the Finder, press Command-K (or you can just go to the Go menu>Connect to Server). When the window appears, type the server's IP address followed by ":" and the port number. It should look like this, where "192.168.2.3" is the IP address and the ":5901" is the port number:


Mac OS X Finder connect to server


10. Hit "Enter." The Screen Sharing application should open up and connect to the server. If you set a password, it will ask you for the password. That's all! It should work. If you run into problems, feel free to leave a comment.


This should theoretically work with a PC as a server, but since Vine Server doesn't have a PC version and I don't have two PCs, I can't test it. Please let me know if you are able to do this with a PC.


Thanks for following this tutorial! If you want to find more tutorials like this, check out my tutorials page.


~Matthew

Thursday, August 18, 2011

How to make a slideshow in iDVD

iDVD is a powerful DVD authoring software developed by Apple. In this tutorial, I will show you how to make a simple slideshow in iDVD. Note that this is a simple tutorial. There are many advanced features in iDVD that I will not cover in this tutorial. Check back for more iDVD tutorials.

1. Open iDVD
2. When the iDVD startup screen appears, choose "Create a New Project".

iDVD: startup screen

3. In the "Create Project" dialog, name your project and choose a location to store it. Also note the Standard/Widescreen selection. Make sure that "Widescreen" is selected.

iDVD: Create new project


4. iDVD will open up your new project with the default theme. You can change the default theme under the "Themes" tab, but for this example I am going to use the default theme "Revolution Main".

iDVD: Main window

5. Go to the bottom left-hand corner and click on the "+" icon>Add Slideshow

iDVD: Add slideshow button


6. A new button will show up underneath the "Revolution Main" header.

iDVD: Revolution Main


7. To put photos into the slideshow, switch to the "Media" tab in the bottom left-hand  corner.

iDVD: Media tab


8. In the Media tab, go to the "Photos" tab.

iDVD: Photos tab within the Media tab


9. Navigate to your photos and select the ones you want in your slideshow.

iDVD: Selecting photos for a slideshow in the Media>Photos tab


10. Drag and drop the photos into the slideshow.

iDVD: Drag and drop photos into a slideshow


11. Down in the bottom right-hand corner, click on "Transition" and select the one that you want. For this tutorial, I have selected "Dissolve" Unfortunately, iDVD does not have a random transition feature.

iDVD: Transition selection for a slideshow


12. In the same corner, click on the "Slide Duration" menu and select the time that you want each picture to appear. You can also select "Fit to Audio", if you have an audio track. See the next step on how to add music to your slideshow.

iDVD: Slide duration for a slideshow


13. In the "Media" tab, click on "Music". Your iTunes library will appear in the browser. 

iDVD: Adding music to a slideshow


14. Drag and drop the tracks that you want in your slideshow at the very top of all the photos. Make sure that you drop the music at the top of the photos, otherwise that music will not play for all the photos.

iDVD: Dragging and dropping music into a slideshow


15. Down at the bottom of the screen next to the slideshow settings, click the "Return" button. This should take you back to the DVD menu.

iDVD: Return button


16. You can drag pictures from the "Media" browser on the left to the drop zones in the menu.


iDVD: Dragging photos into menu dropzones


17. To change the main title of the DVD menu, double-click the title "Revolution Main" and enter your own title.

iDVD:


18. A useful tool is the TV Safe Area. Go the View menu>Show TV Safe Area. The TV Safe Area is the area that you can safely place content without accidentally cutting off some of the content.

iDVD: Show TV Safe Area menu selection

iDVD: TV Safe Area


19. You are done! To burn your DVD, go to File>Burn DVD… Insert a DVD when iDVD prompts for one, and wait about an hour for the DVD to render and burn.
iDVD: Burning a slideshow to DVD


iDVD: Creating your DVD and burning

Thursday, August 11, 2011

How To Make Grooveshark A Stand-Alone Application with Hot Keys, Part 2 of 2 for Windows Users

Click here for the first part of this tutorial.

Grooveshark logo


1. Download Wget for PC here and grab a copy of AutoHotKey here. Install both.

AutoHotkey logo


2. Open AutoHotkey, (it's located wherever you downloaded it). When it asks you if you want to generate a example script, click "Yes".


Create sample script in Auto Hot Key

3. Create a new hot key for Grooveshark by adding this line:
    HOTKEYS::Run, WGET_EXE --spider --no-cache KEYSHARKY_API, , Hide

4.  The "HOTKEYS" is where you define the keyboard shortcut. For example, you could put #G (Windows key and "G" key) See the AutoHotkey documentation for more info.

5. Replace the WGET_EXE with the path to the location of the wget executable. Normally it is installed in C:\Program Files (x86)\GnuWin32\bin\wget.exe If you are not sure where it was installed, go to the Start Menu>Run>cmd. Once you are in the command line, run this command:
     dir c:\ /s /b | find "wget.exe"
When it returns the path, copy and paste the path and replace the WGET_EXE section.

WGET command prompt


When you are all finished, the code will look similar to this, except the keyboard shortcut will be your own:
    !+z::Run, "C:\Program Files (x86)\GnuWin32\bin\wget.exe" --spider --no-cache "http://localhost:8800/play", , Hide
The above code will play/pause Grooveshark when ALT + SHIFT + Z is pressed.


6. Repeat steps 3-5 to add another hot key. See the below commands to change the hot key command.
Adding hot keys to Auto Hot Key

This is a list of all the keySharky commands. To change the hot key command, change the URL (http://localhost:8800/play)

Play/Pause current song:
http://localhost:PORT/play

Stop playing current song:
http://localhost:PORT/stop

Select previous song in playlist:
http://localhost:PORT/previous

Select next song in playlist:
http://localhost:PORT/next

Favorite current song:
http://localhost:PORT/favorite

Vote up current song:
http://localhost:PORT/voteup

Vote down current song:
http://localhost:PORT/votedown

Clear vote of current song:
http://localhost:PORT/voteclear

Toggle mute (>= version 1.5.2):
http://localhost:PORT/mute

Decrease volume (>= version 1.5.2):
http://localhost:PORT/voldown

Increase volume (>= version 1.5.2):
http://localhost:PORT/volup

Replace "PORT" with whatever port number you chose in the keySharky preferences.

The API server has access to every keyboard shortcut toggle in keySharky, so you can play, stop, select next song etc. easily with one of the above methods.

You are done!! Have fun using your Grooveshark player and thanks for following this tutorial. Please follow my blog if you liked this tutorial.

-- Matthew

How To Make Grooveshark A Stand-Alone Application with Hot Keys, Part 2 of 2 for Mac Users

Click here for the first part of this tutorial.


Grooveshark logo


1. Download Spark, a free global hot key application for OS X. You pick up a copy here.


Spark logo


2. Once you have installed Spark, launch it. When the Spark window starts up, create a new Applescript hot key by either going to the gear menu in the top left-hand corner and selecting Applescript or by going to File>New HotKey>Applescript


Spark: Gear Menu>New Hotkey>Applescript


Spark: File>New Hotkey>Applescript /></span></a></div>
<span class=


3. Enter this information in the setup window that slides down:
1. Shortcut: ⌃⌘⌥ F8 (you can change this to anything)
2. Name: Play/Pause Grooveshark (again, you can change this name to anything)
3. Down in the text area, enter this:
     do shell script "curl http://localhost:8800/play"
(Note: If you changed the default port number in keySharky, the port number in the hot key preferences needs to be changed too.)


4. Repeat for all other hot key commands that you want. See below for all the keySharky commands.


5. Also, make sure that the Spark daemon has been started, otherwise your hot keys will not work. The "Start Spark Daemon" button is at the very bottom in the center of the Spark window.


Start Spark daemon


This is a list of all the keySharky commands. To change the hot key command, change the URL in the hot key preferences.


Play/Pause current song:
http://localhost:PORT/play


Stop playing current song:
http://localhost:PORT/stop


Select previous song in playlist:
http://localhost:PORT/previous


Select next song in playlist:
http://localhost:PORT/next


Favorite current song:
http://localhost:PORT/favorite


Vote up current song:
http://localhost:PORT/voteup


Vote down current song:
http://localhost:PORT/votedown


Clear vote of current song:
http://localhost:PORT/voteclear


Toggle mute (>= version 1.5.2):
http://localhost:PORT/mute


Decrease volume (>= version 1.5.2):
http://localhost:PORT/voldown


Increase volume (>= version 1.5.2):
http://localhost:PORT/volup


Replace "PORT" with whatever port number you chose in the keySharky preferences.


The API server has access to every keyboard shortcut toggle in keySharky, so you can play, stop, select next song etc. easily with one of the above methods.


You are done setting up your Grooveshark application!! Thank you for using this tutorial and please follow my blog if you liked it.


-- Matthew

How To Make Grooveshark A Stand-Alone Application with Hot Keys, Part 1 of 2


Grooveshark logo


This tutorial will show you how to make Grooveshark a stand-alone application with hot keys, for free! First, you'll need to download these files.
Mozilla Prism logo


1. Download Prism here. Prism is an application developed by Mozilla, and turns web URLs into standalone applications. More information about Prism can be found at the Prism wiki.


Download Mozilla Prism


2. Open Prism and fill in the information as follows:
1. URL: http://www.grooveshark.com
2. Name: Grooveshark
3. Select the checkboxes "Show status messages and progress", "Desktop" (Under "Create Shortcuts")
4. Under the "Settings" drop-down menu (at the bottom), navigate to the folder that you downloaded earlier and select "grooveshark_icon.png"
5. Click "OK"


Main Mozilla Prism window


Your new Grooveshark application will show up on your desktop and the application will launch itself.


Notice that the advertisement sidebar is showing on the left side of the application. We will fix that later.


New Grooveshark Prism application


3. Install Greasemonkey and keySharky. They are both included in the folder that you downloaded earlier in this tutorial. The two files that you want are called "greasemonkey-for-prism-0.8.20100413.0.xpi" and "keySharky-prism-latest.xpi". If you want to, you can download them (for newer versions with possible updates). Greasemonkey for Prism can be downloaded here and keySharky for Prism can be downloaded here. Note that if you are going to download these add-ons, you cannot use Firefox to download them. Firefox will see these files as add-ons and try to install them in Firefox.


Grooveshark ad sidebar


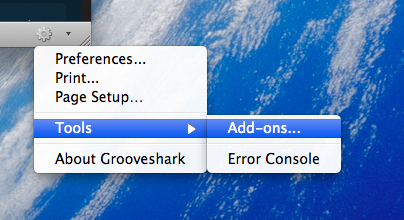
4. Go back to your Grooveshark application that you created with Prism, and click the gear icon at the bottom right-hand corner of the Grooveshark application. Go to Tools>Add-Ons…


Greasemonkey logo


5. In the Add-Ons window, click the "Install" button down on the bottom of the window. Navigate to the Greasemonkey add-ons (either in the folder that you downloaded at the very beginning or if you downloaded it, in your downloads folder). A window will ask if if you are sure you want to install the add-on:


Tools>Add-ons in Prism application


Mozilla Prism application: Add-ons window


Mozilla Prism application: Installing add-ons


You will also have to wait for five seconds before you can install it (until the "Install Now" button appears).


6. The add-ons window will now ask you to restart the Grooveshark application. Restart Grooveshark and repeat the last two steps to install the keySharky add-on.


7. Open up the Add-Ons window again (Gear menu>Tools>Add-Ons…) and make sure that both Greasemonkey and keySharky are installed.


8. Before you close up the add-ons window, click the "Preferences" button for keySharky and make sure that the "Start with Prism" checkbox is selected and click the "Start" button to start the API server for keySharky. Also, note the port number. By default, it is 8800, but you can change it to whatever port you want.


You are now done setting up the Grooveshark application. Click here to go to part 2 for Mac users. Click here to go to part 2 for Windows users.


-- Matthew